Last updated on Monday, January 23, 2017
Today I’ll show you how to add keyboard shortcuts to your APEX 5.0 application so that pressing a key combination will navigate to a specific page. For example you could have Ctrl+Alt+D bring you to your “dashboard” page from any other page in your app.
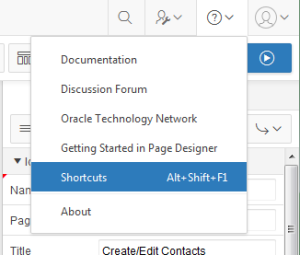
You may have noticed that the Page Designer supports a number of keyboard shortcuts. To see a list of shortcuts click on the Help menu or press Alt+Shift+F1.
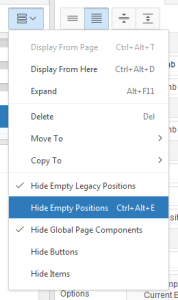
All the shortcuts are for navigating around or performing some action in the Page Designer. The shortcuts are also shown where appropriate in popup menus such as the Grid Layout Menu.
The core implementation behind this is in the undocumented JavaScript API apex.actions (from libraries/apex/actions.js). The name comes from the actions concept in desktop GUI frameworks such as Swing. An action encapsulates UI state as well as behavior. As a concrete example look at the Expand/Restore functionality, which maximizes the area for the Grid Layout. You can access this functionality using the Expand/Restore toolbar icon button, the Grid Layout Menu, or the Alt+F11 key. No matter where this feature is presented or how it is accessed it all comes from a single action object. The action consists of the UI label (in this case dynamic antonyms Expand or Restore), the shortcut key Alt+F11, the state; expanded or not, the icon and the action function that actually collapses or restores the splitters. Whenever the action state is updated the presentation (menus, buttons etc.) are all updated. This is how the state, icon, and labels (tooltip) are kept in sync between the button and the menu.
This is far more complex than what you’ll be implementing today but I wanted to give a little background so you know that there is more going on than a simple keydown event handler.
Even though the actions JavaScript API is undocumented the keyboard shortcut feature is exposed through the Universal Theme Navigation Menu and it uses the same actions facility under the covers. Unfortunately you would likely never find it on your own. That is our fault. The way someone might stumble on it is by looking at the template options for the Top Navigation Menu list template and asking what does the Add Actions option do? Now that I’ve told you about actions you might guess but we should have named this option better. Something like Enable Keyboard Shortcuts. Perhaps we will make this clearer in the future. There is one more stumbling block. Unlike all the other template options this one requires an extra JavaScript file to be loaded. The actions.js file is not loaded by default. Without this file checking the option does nothing.
[Update Jan-2017: Starting in APEX 5.1 the actions.js file is loaded as part of the default set of JavaScript files for all desktop pages.]
Enough background, lets get started.
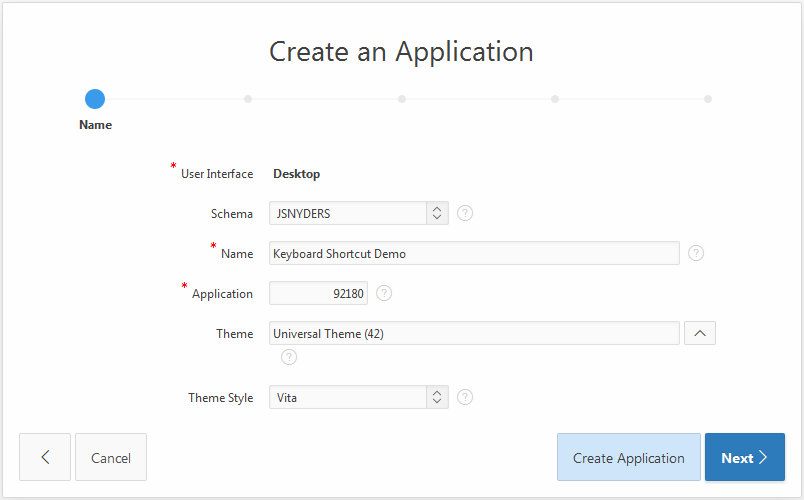
Step 1. Create a new application using the Universal Theme. Click Application Builder menu. Click Create. Click Desktop. Name the application Keyboard Shortcut Demo.
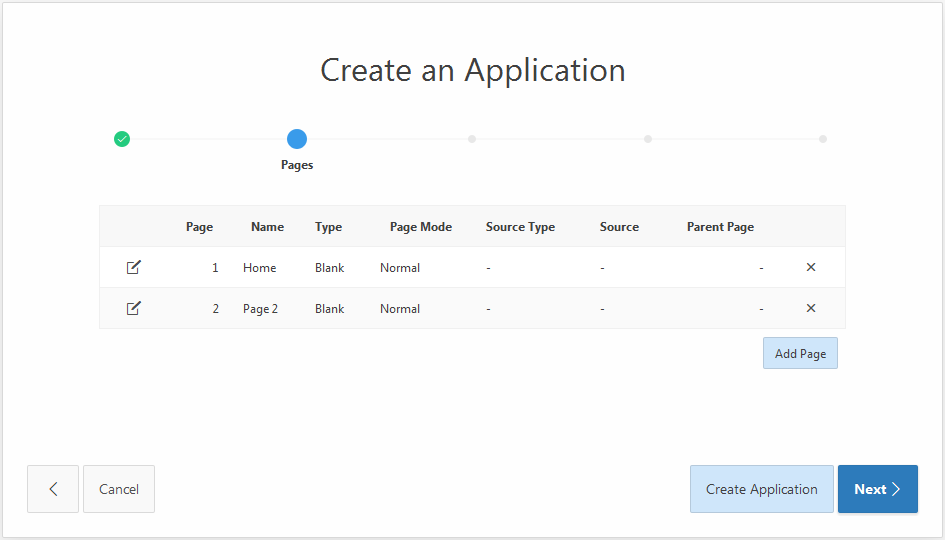
Click Next. The home page will be the page to navigate to with a keyboard shortcut. Now add another page so we have some other page to navigate from. Click Add Page. Click Blank and then Click Add Page.
Now click Create Application. On the confirmation step click Create Application again.
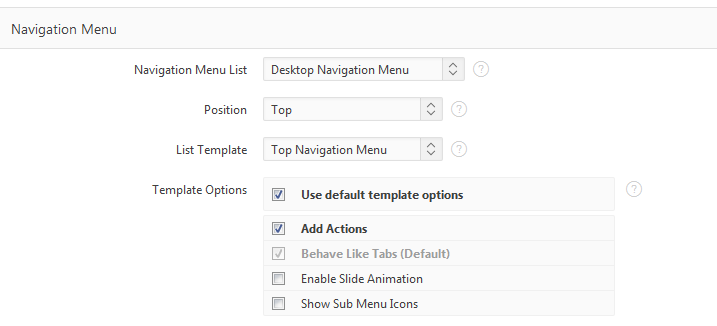
Step 2. If you run the app now you will see that it uses a left side tree for navigation. This is the default but keyboard shortcuts are integrated with the menu so you must switch to top menu navigation. Click Edit Application Properties. Click User Interface tab. Click the edit desktop icon button. In the navigation menu section Change Position to Top and List Template to Top Navigation Menu. Now Template Options appear. Check the Add Actions option. Click Apply Changes. Now if you run the app you will see that it has a menu bar (it looks more like tabs because we don’t have enough pages to create drop down menus).
At this point the Add Actions option isn’t doing anything because we still need to add the actions.js file. There is no indication that this needs to be done except a browser console warning which you won’t normally see. I mention this so that I can introduce a new APEX 5.0 feature; the client side debugging API. In the browser window/tab that the app is running in open the browser developer tools/Firebug console window. Then in the APEX developer toolbar click the Debug button. After the page refreshes you should see this warning: “Include actions.js to support menu shortcuts”. The APEX JavaScript libraries use the new apex.debug API to write error, warning, and informational messages to the console. Your apps or plug-ins can do the same. Errors are always written but other messages are not by default. To see warnings or other messages use the same debug YES flag that turns on server debug logging. See the Application Express API Reference documentation for details.
Step 3. Add actions.js. Because the navigation menu is on [just about] every page you should load actions.js on every page. The best way to do that is to go back to Desktop User Interface Details (From the main application page click Edit Application Properties, click User Interface, click Edit Desktop). In the JavaScript section add the following to File URLs.
[Update Jan-2017: Starting in APEX 5.1 the actions.js file is loaded as part of the default set of JavaScript files for all desktop pages. So this step can be skipped.]
#IMAGE_PREFIX#libraries/apex/#MIN_DIRECTORY#actions#MIN#.js
Now if you refresh the application you should see that the warning is gone.
Step 4. Finally it is time to add the keyboard shortcut. Click Shared Components. Under Navigation click Lists. The list that drives the navigation menus is called Desktop Navigation Menu; click on it. We want to add a shortcut to navigate to the home page so edit the Home page. The shortcut is defined using the User Defined list attributes. Here is an APEX 5.0 gem that you may not have heard about. In the past if you wanted to know what user defined attributes did you would have to open up the intended list template and dig around. Now you can just click the List Template Attributes button, select the theme and list template and you get a list of attributes. This is provided that the list template author bothered to give the attributes a description.
Tip for all the list template authors out there: give your attributes a description. You will thank yourself someday.
Click List Templates Attributes. Select Universal Theme. Select Top Navigation Menu. Note that A01 is the ID and A05 is the shortcut key. Close the dialog.
All actions are identified with a unique name or id. So for A01 enter go_home. For A05 enter Ctrl+Alt+D.
A note about key names. The actions facility is picky about the format of the key names. Modifiers such as shift must be given in this order: Ctrl, Alt, Meta, Shift and match those names exactly. The + character separates the modifiers and the key name.
Now go back to page 2 of the app and refresh it to make sure it has all the latest changes. Press Ctrl+Alt+D. You should find yourself on the home page!
No matter how many pages you add, as long as the navigation menu is on that page, you can use the shortcut key.
One word of caution before you go to crazy with this feature. Unfortunately in web browsers many keys are used by the browser itself. Also there are keys that are used by the operating system. And if that isn’t bad enough browser plug-ins may take over some key combinations. You need to try your best to pick keys that are not used by the browsers or operating systems that your users are using. We thought we did a good job picking the keys for Page Designer but then a Ubuntu Linux user pointed out some keys that weren’t available on that system.
I’ll show one more thing that you can do with actions. Recall how in Page Designer there were some actions that could be done using a menu or a button. Once you have defined an action you can invoke it from a button. This is how you turn an ordinary APEX button into an action button.
Step 5. Go to page 2 in the app and click Edit Page 2 in the developer toolbar. Add a static content region to the Content Body and add a button anywhere in that region. Set the Name to GO_HOME and set the Label to Home. To make a button an action button you need to do three things:
- Add
js-actionButtonto CSS Classes. - Add attribute
data-actionwith a value equal to the action id to Custom Attributes. In this case adddata-action="go_home". - Set Action to
Defined by Dynamic Action. The action isn’t really defined by a dynamic action but you don’t want any of the other choices either. Think of Defined by Dynamic Action as “none of the above”.
Save and run page 2. You now have a button that will bring you to the home page. Note that it doesn’t mater what label you give this button because if the action already has a label (as it does in this case because it is defined by the menu) then the button will have the same label. In the same way a button and menu can share the same icon (make sure the button Icon CSS Classes has at least the icon type such as “fa”).
Here is a demo app that is essentially the same as described here but with icons for both the home page and page 2, keyboard shortcut Ctrl+Alt+2 to go to page 2, and page 2 was added as a sub menu item so you can see that it automatically shows the shortcut key in the menu item label. This shows that top level menu items such as Home never show an icon or shortcut key even if they have them defined but they can still be used by actions.
[…] APEX 5.0 and Custom Keyboard Shortcuts […]