Last updated on Wednesday, March 29, 2017
Part one of this series covered Interactive Grid advanced configuration. This part is about a specific area of configuration, which is toolbar and menu customization. This blog series assumes at least intermediate level experience with APEX and JavaScript.
[Update 5.1.1 29-Mar-2017] This article has been updated to reflect patch release 5.1.1
Toolbar and Menu Customization
Interactive Grid (IG) allows a great deal of customization to its toolbar and menus. The toolbar is implemented by a new toolbar widget (file widget.toolbar.js). Like most widgets the toolbar is configured with an options object given to it when it is created. The IG widget creates the toolbar widget but gives control over the content through advanced configuration as will soon be shown. A toolbar contains an array of control groups and each control group contains an array of controls. Controls can be: buttons, toggle buttons, menus, radio groups, select lists, text fields, or static text. What a control does is defined by an APEX action. Menus use the APEX menu widget. The menu option structure is embedded in the toolbar option structure. I have written about actions and menus before.
To see what the structure of the IG toolbar and its menus looks like type the following in the browser’s JavaScript console and explore the returned array.
$.apex.interactiveGrid.copyDefaultToolbar();
or
JSON.stringify($.apex.interactiveGrid.copyDefaultToolbar(), null, 4);
To customize the toolbar, in the Advanced JavaScript Code function you need to set the toolbarData property to the structure that will be passed as the data property of the toolbar widget options object. This is typically done by getting a copy of the default toolbar using the copyDefaltToolbar function. The following example shows how to make opening the filter dialog more easily accessible by adding it as a toolbar button.
[Update 5.1.1] The following example is updated to use the toolbarFind method.
function(config) {
    var $ = apex.jQuery,
        toolbarData = $.apex.interactiveGrid.copyDefaultToolbar(),
        toolbarGroup = toolbarData.toolbarFind("actions1"); // this is the group with the actions menu

    // add a filter button after the actions menu
    toolbarGroup.controls.push( {
        type: "BUTTON",
        action: "show-filter-dialog",
        iconBeforeLabel: true
    });
    config.toolbarData = toolbarData;
    return config;
}
Here is what the toolbar looks like after adding the above advanced configuration code.

[Update 5.1.1] The toolbar array returned by copyDefaultToolbar includes a method toolbarFind. This method is used to find any toolbar control group, control or menu item by id or action name. The id and action properties can be seen when you explore the structure as described above.
You should not modify the initial array value of the toolbarData property but instead assign a new array as shown above. You could also just create your own toolbar content data. The following example creates a very simple toolbar with just a search field and go button and a filter button.
function(config) {
    config.toolbarData = [
        {
            groupTogether: true,
            controls: [
                {
                    type: "TEXT",
                    id: "search_field",
                    enterAction: "search"
                },
                {
                    type: "BUTTON",
                    action: "search"
                }
            ]
        },
        {
            controls: [
                {
                    type: "BUTTON",
                    action: "show-filter-dialog",
                    iconBeforeLabel: true
                }
            ]
        }
    ];
    return config;
}
Here is the resulting toolbar.

Note that the declarative option Toolbar: Buttons Reset is still checked but no Reset button is shown because it doesn’t exist in the toolbar. If you added another control group at the end of the toolbarData array in the previous example as follows then the Reset button will then be shown or hidden based on the Toolbar: Buttons Reset checkbox.
    {
        align: "end",
        controls: [
            {
                type: "BUTTON",
                action: "reset-report",
                iconBeforeLabel: true
            }
        ]
    }
Just because a button or menu item doesn’t exist doesn’t mean that the corresponding action doesn’t exist. An action is a named behavior along with its UI state (state includes hidden/shown, enabled/disabled, label, icon, and shortcut key). The toolbar and menus just provide the UI for invoking an action, or for toggle and radio group actions setting or getting its value. This is why you typically don’t need to specify things like the icon or label because it is taken from the action.
The above examples should give a good idea of how you can move things around in the toolbar and menus but if you really want to disable or hide something you should do it through the actions API. Also if you want to add your own custom functionality it means adding an action and then adding a toolbar button or menu item to invoke it.
You add or modify actions by setting the initActions property of the config object to a function which receives the IG actions context. The next example shows how to add a toolbar button at the very end that runs your own action. The action is very simple. It just opens an alert dialog. Add the code to the IG Advanced JavaScript Code attribute.
function(config) {
    var $ = apex.jQuery,
        toolbarData = $.apex.interactiveGrid.copyDefaultToolbar(),
        toolbarGroup = toolbarData[toolbarData.length - 1]; // this is the last group with reset button

    // add our own button
    toolbarGroup.controls.push( {
        type: "BUTTON",
        action: "my-action"
    });
    config.toolbarData = toolbarData;

    config.initActions = function( actions ) {
        // can modify state of existing actions or add your own
        // can also pass in an array of actions to add
        actions.add( {
            name: "my-action",
            label: "Hello",
            action: function(event, focusElement) {
                alert("Hello World!");
            }
        } );
    }
    return config;
}
Here is what this toolbar looks like.

Here, for simplicity, I’m using hard coded English labels with the label property. It is a better practice to define Text Messages under Shared Components, Set Used in JavaScript to Yes and then reference the message key in the action definition like this: labelKey: "MY_MESSAGE_NAME".
This next example shows how to hide the Data > Aggregate menu item and add a keyboard shortcut to open the filter dialog and another keyboard shortcut to save changes.
function(config) {
    config.initActions = function( actions ) {
        actions.hide("show-aggregate-dialog");
        actions.lookup("show-filter-dialog").shortcut = "Ctrl+Alt+F";
        actions.update("show-filter-dialog");
        actions.lookup("save").shortcut = "Ctrl+Alt+S";
        actions.update("save");
    }
    return config;
}
This shows the effect on the Actions menu.
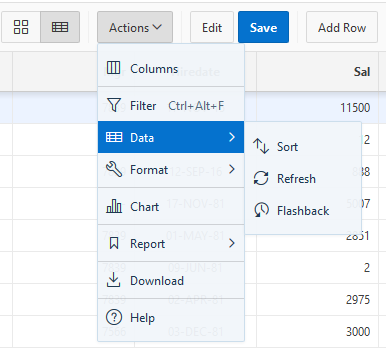
Using the techniques introduced in part 1 you should realize how to add keyboard shortcuts for all Interactive Grids in your application from a single common function. Note focus must be within the IG for these shortcuts to work.
Always first check for a declarative attribute that controls the toolbar or menus. For example set the Enable Users To: Download: attribute to No rather than use advanced configuration to hide the corresponding action.
Some types of toolbar controls can’t be shown/hidden via actions; specifically text fields, menu buttons (or sub menus), and static text. To show/hide or enable/disable these toolbar controls you need to use the toolbar widget API. I’m not going to go into that now. You can read the code doc comments on your own and maybe I’ll cover that in a future article. You could also just remove them from the toolbarData structure.
[Update 5.1.1] You can get access to the toolbar widget from the IG widget using the getToolbar method. Here is an example that may not be too useful but gives an idea how to control the toolbar. The following sets the value of the search field and then invokes the search action.
var ig$ = apex.region("emp").widget();
ig$.interactiveGrid("getToolbar")
    .toolbar("findElement", "search_field").val("FORD");
ig$.interactiveGrid("getActions").invoke("search");
See also the Sample Interactive Grids app page Reporting > Add Toolbar Button for another example of adding a custom toolbar button.
Grid View Menus
Another thing people want to do is customize the Row Actions or Selection Actions menus of the grid view. This is possible but a little more involved because these menus are associated with the grid view rather than the IG toolbar. It should not be a surprise that these menus are implemented with the APEX menu widget. So if you know the DOM element id you can manipulate the menu using the menu widget API. In the future there should be an easier way to get at these menu elements. For now if you poke around you will find that the row actions menu id has the suffix “_ig_row_actions_menu” and the selection actions menu has the suffix “_ig_selection_actions_menu”. [Update 5.1.1] The previous sentence is still true but now there is a better way to get at the menus without having to know the element id.
[Update 5.1.1] The following example is updated with the new preferred way to access the grid view menus. So on a page with an editable IG with Static ID emp from the browser’s console you could type
apex.region("emp").widget()
    .interactiveGrid("getViews").grid
    .rowActionMenu$.menu("option")
    .items.push({type:"action", label:"Hi", action: function(){alert("Hi")}});
and this will add a new row action menu item labeled Hi and when you click it an alert will pop up. You could run code something like this when the page loads however, the problem is that if the IG supports multiple views such as chart or icon then it is possible that a view other than grid will be used when the page first loads. In this case the grid menus don’t exist yet. You will get an error if you try to access them. The following example shows a safe way to add to the row actions menu. Add the following code to the page attribute JavaScript: Execute when Page Loads [Update 5.1.1] JavaScript: Function and Global Variable Declaration. This assumes the page has an editable IG with an Actions Menu column, a column named ENAME and Static ID emp. You could try this with the Sample Interactive Grids app Basic Editing page.
[Update 5.1.1] The following example is updated to show using the view rowActionMenu$ property and the new viewchange created flag.
// do this after the page loads but before the IG is initialized to catch the initial events
$(function() {
    // listen for view change events to find out when grid views are created
    $("#emp").on("interactivegridviewchange", function(event, data) {
        if ( data.view === "grid" && data.created ) {
            var view = apex.region("emp").widget().interactiveGrid("getViews", "grid"),
                menu$ = view.rowActionMenu$;

            menu$.menu("option").items.push({
                type:"action",
                label:"Hi",
                action: function(menu, element) {
                    var record = view.getContextRecord( element )[0];
                    alert("Hi " + view.model.getValue(record, "ENAME") );
                }
            });
        }
    });
});
Here is the resulting Row Actions menu.
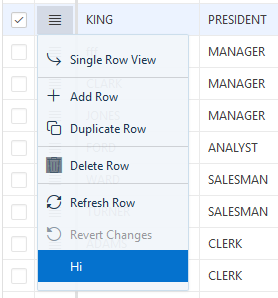
The menu action shows how to get the record associated with the row and how to use the model to extract the value of the ENAME column. I hope in the future there is an easier way to detect when the grid view (or any other view) first becomes initialized/shown.
[Update 5.1.1] The following example is updated to show using the view selActionMenu$ property and the new viewchange created flag.
Adding to the Selection Actions Menu is very similar. The following is an example that does just that. Replace the Add the following code to the page attribute JavaScript: Function and Global Variable Declaration. An additional requirement is that the IG has a numeric column called addGridMenu in the previous example with this one.SAL.
// do this after the page loads but before the IG is initialized to catch the initial events
$(function() {
    // listen for view change events to find out when grid views are created
    $("#emp").on("interactivegridviewchange", function(event, data) {
        if ( data.view === "grid" && data.created ) {
            var view = apex.region("emp").widget().interactiveGrid("getViews", "grid"),
                menu$ = view.selActionMenu$;

            menu$.menu("option").items.push({
                type:"action",
                label:"Total Salary",
                action: function(menu, element) {
                    var i, records = view.getSelectedRecords(),
                        total = 0;
                    for ( i = 0; i < records.length; i++) {
                        total += parseInt(view.model.getValue(records[i], "SAL"), 10);
                    }
                    alert("Total Salary is " + total);
                }
            });
        }
    });
});
Here is the resulting Selection Actions menu.
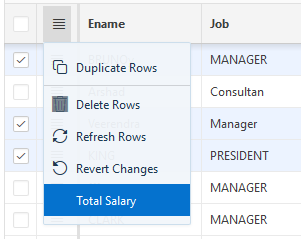
This example shows how to get all the selected records. It then loops over them to calculate the total. More information about using the model API will be in a future part of this series.
While were on the topic of menus, some people prefer a UI style that is more familiar to desktop application users. In the desktop style there is no need for check boxes to select multiple rows. You can use shift click etc. You would also expect to use a context menu to perform actions. To accomplish this:
- Set the Row Selector column attribute Hide Control to Yes
- Delete the Actions Menu column.
- To add the Selection Actions Menu as the context menu add this to Advanced JavaScript Code:
function(config) {
    config.defaultGridViewOptions = {
        contextMenuId: "emp_ig_selection_actions_menu"
    }
    return config;
}
The above assumes the Static ID is
empchange to your region Static ID.
The resulting Interactive Grid with context menu open looks like this.
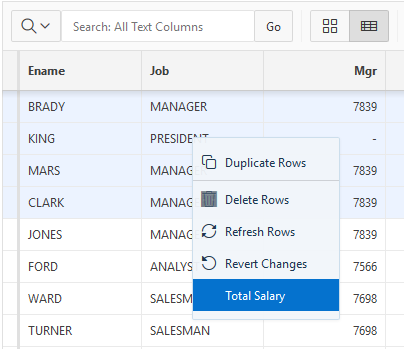
The grid view column header popup is not really a menu; it is not implemented with the menu widget. It is not supported or recommended to change the column header popup.
You should now be able to customize the IG toolbar and menus. You may have lingering questions about how to do useful things from any actions you add. Some of these questions may be answered in the next part of this series where I'll cover programmatic control of Interactive Grids.
hi John,
What if I wanted to invoke an action of another grid’s toolbar? Consider I have 2 grids and would like to invoke the “save” actions of both grids upon clicking a (custom) button on one of the grids. How do I get to the context of the other grid to get a handle on its action?
I am guessing something like:
apex.region(“<static_id_of the_non-default_region").widget().interactiveGrid("getViews", "toolbar").context .. , but little stuck here .. Yes, I could just submit the page instead, if I didn't have two more grids on the page, that I do not want to submit with the same Save button ..
thanks in advance!
@Jas yes you can use class js-actionButton along with data-action on any APEX button to invoke an action. I mentioned this here:
https://hardlikesoftware.com/weblog/2015/04/19/apex-5-0-and-keyboard-shortcuts/
Hey John i was looking into interactive grid and found in js file of IG they are using H=”js-actionButton” which actually do the magic to Edit rows can you explain this in more depth !!
How this triggers!! can we use the same for different reports !!etc..
Thank you really appreciate you’re efforts and time.
I eventually found the wok-around.
@Adi, I recommend you ask your question on the APEX forum https://community.oracle.com/community/database/developer-tools/application_express
You would need to provide more information. I was not able to find the app and page where the problem happens.
Hi John i have been following this blog post and it’s very interesting.
I wanted to ask you if there is a way where by we can hide or colored different buttons in IG. About this JS i tried using it on Execute when page loads and in DA but it seems like i am not able to make it work .
workspace : ***
user/pass : ***/***
If you have some spare time just look into it.
Error : Can not define push on undefined object.