This topic has been motivated by a few different APEX forum threads as well as direct questions from teammates. Here I will show how to add a menu button to each row of an interactive report that will open a menu and the menu item actions will be specific to the row.
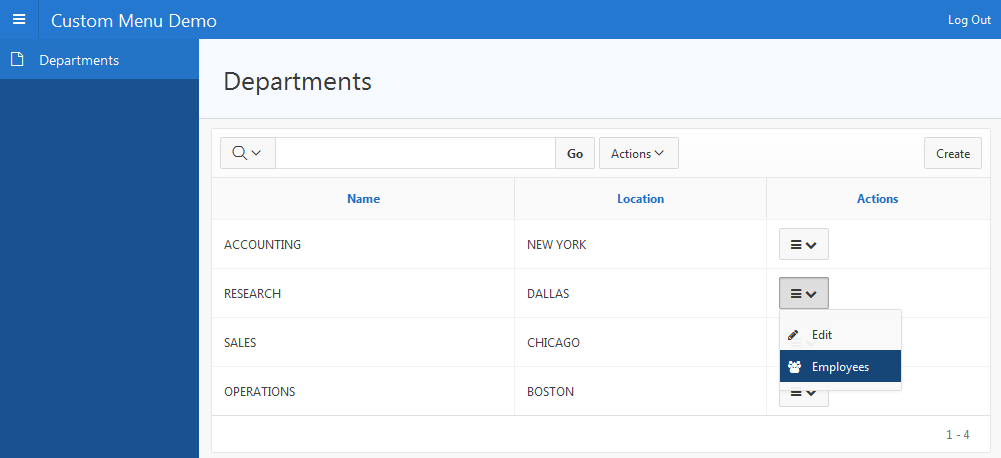
The above pictured Custom Menu Demo is available to try out and to download. This article assumes some familiarity with APEX and JavaScript.
Simple Popup Menu
Before going into how to create a custom menu let me make sure that we all know how to create a simple list based popup menu.
I don’t think there have been many examples of creating popup menus. The Universal Theme Sample Application has an example of the Menu Bar template under lists but not Menu Popup. Of the two I think Menu Popup is far more useful. If you want a menu bar for navigation then you probably want to use Top Navigation Menu with the Navigation Menu feature1. If most of the menu bar menu items will be doing client side dynamic behavior then a list based menu bar probably isn’t what you want either. The only other thing I have to say about menu bars is that, if you do use them, you must make sure that the region they are in is tall enough to fit the menu. Ideally the region should take up most of the page. This is because top level menu bar menus are not relocated to the end of the DOM, as popup menus are, so you must ensure that they are not clipped by their container.
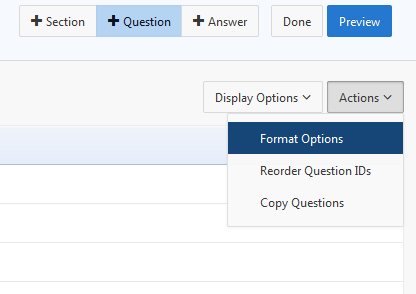
One example of where popup menus are used is in the Survey Builder packaged app on the questionnaire editing page (page 30). The figure below shows the Actions menu expanded. The Display Options button also opens a menu. These menus are simply lists that use the Menu Popup list template and are opened by menu buttons.
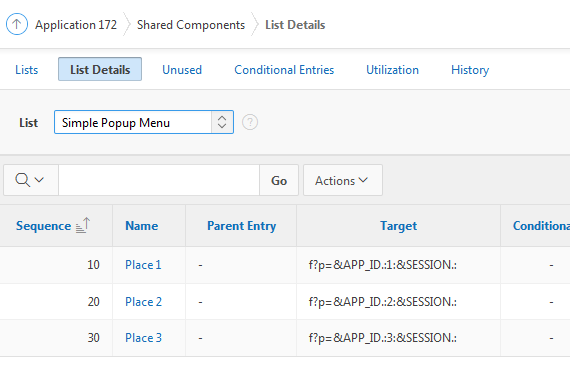
To create a popup menu simply create a list like any other (go to Shared Components > Lists). The items in the list will be the items in the popup menu. Here I created a list called Simple Popup Menu with items Place 1, Place 2, and Place 3 linking to pages 1, 2, and 3 respectively.
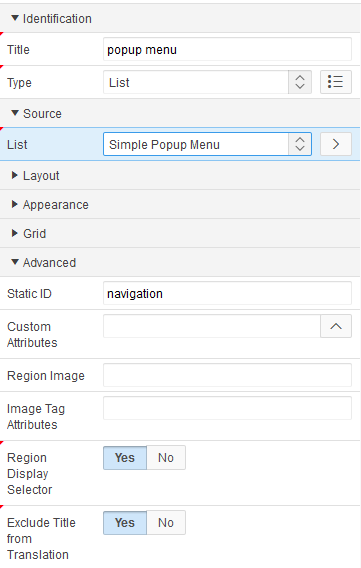
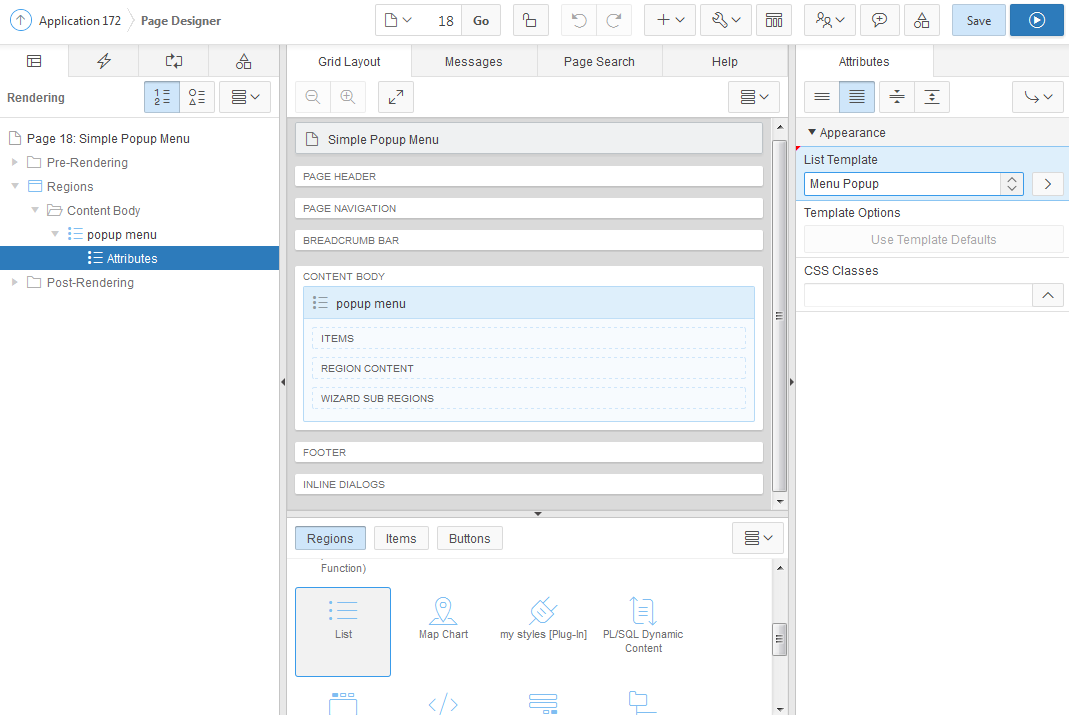
Add the list to the page you want the menu on. Add a list region and select the Simple Popup Menu list. The title is not important because it will not be seen. You can exclude the title from translation. Give the list a Static ID to make it easier to reference from the menu button. I used “navigation” for the static id so the menu element will be called “navigation_menu”. This will be needed later. Set the Template under Appearance to – Select - (not shown in figure below) so that nothing but the list will be rendered.
For the list attributes select Menu Popup for the list template.
If you now save and run the page you will not see the list because it is turned into a menu that is popped up as needed. The next step is to create a menu button to open the menu. A menu button is just a normal button with a specific CSS class and data attribute.
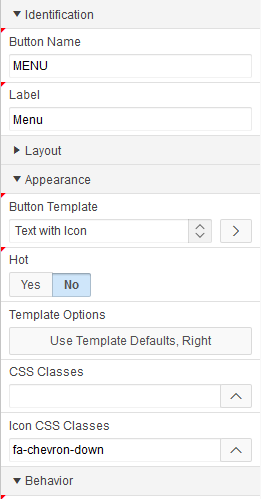
Add a button to the page. Add a region first to contain the button if needed. In this example I created a Text with Icon button and labeled it Menu. I gave it an icon fa-chevron-down and kept the default template option so it displays on the right. At this point we have a regular button that will submit the page.
To make it a menu button do the following:
- Under Appearance set CSS Classes to
js-menuButton. - Under Advanced set Custom Attributes to
data-menu="navigation_menu"The value of the data-menu attribute is the id of the menu which comes from the region static id with the “_menu” suffix added. - Under Behavior set Action to
Defined by Dynamic Action. Even thought there will be no dynamic action this is the appropriate setting because you don’t want the button to do anything else such as submit the page2.
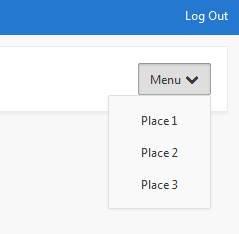
If you run the page you will see that the button will open the menu and you can easily navigate to any of the pages in the list. The following image shows what the end result looks like.
If I were presenting this at a conference there would be plenty of raised hands by now so let me try to answer some questions.
Q: What if I’m not using Universal Theme can I still have a list based popup menu?
A: Yes. You should copy the Menu Popup template from theme 42 to your theme.
Q: Can the button be a text button or icon button?
A: Yes.
Q: Why not just use a dynamic action on a normal button?
A: It would be possible to open (or better toggle) a menu from a DA JavaScript action but the menu button method is more declarative and has built-in usability and accessibility features. When the menu is open the button has an active state. The aria haspopup and expanded attributes are managed appropriately. The down arrow key can be used as well as enter and space to open the menu and the first menu item is initially focused.
Q: How does a menu button actually work?
A: The menu widget adds delegated click and key down handlers to the document body to handle toggling menus and adjusting the button attributes as just described. The requirements for a menu button are simple. It must be a button element (so button templates that use an anchor won’t work). The button element must have a class js-menuButton and a data-menu attribute with the id of the menu widget as the value. The code for this is in widget.menu.js if you are currious (search for MenuButton).
Q: What if I want a menu item to do something other than navigate to a URL?
A: This gets a little tricky. There are two options. One is to use a javascript pseudo scheme URL to call some JavaScript on the page. In general I don’t recommend using javascript URLs but if you look at the Survey Builder example shown above you will see that I didn’t follow my own advice. The other option is to use the undocumented menu widget methods to add a JavaScript action to the menu. I hope that someday APEX provides nice integration between menus and dynamic actions. The general technique is to give the menu list item an ID using A01. Then use the menu widget find method to look up that item and assign a function to the action property. This may make more sense by the end of this article.
Q: Does the Menu Popup template support extra attributes and template options like Menu Bar or Top Navigation Menu?
A: Unfortunately not exactly. It does use the A01 to A05 attributes in the same way as the Top Navigation Menu but these attributes are only described in the Top Navigation Menu template. For example you can set A02 to true to disable the menu item. Menu Popup doesn’t have any template options. Some of the Template options for menu bars don’t apply to popup menus but the Add Actions and Enable Slide Animation template options do apply. If you want to use these options you will need to create your own Menu Popup template borrowing the appropriate template options and corresponding JavaScript code from one of the menu bar templates.
Q: Can the menu items have an icon?
A: Yes. Just choose an icon for Image/Class from the popup. Due to a bug you will have to add the icon type prefix. So for example rather than fa-bell you will need to enter fa fa-bell. This is also true for the Top Navigation Menu.
Q: What if I want to open the menu from some other event?
A: This is possible by using the undocumented menu widget toggle method. For example you can create a dynamic action on a region with Custom Event contextmenu. Then in a JavaScript action add this code
var event = this.browserEvent;
$("#navigation_menu").menu( "toggle", event.pageX, event.pageY );
event.preventDefault();
Now when you right click anywhere in the region the navigation menu will popup. As the event name suggests this is a context menu and the thing about context menus is that they are context sensitive. The simple menu in this example is static. Each menu item always does the same thing regardless of where the right click is done. Making a menu context sensitive is the motivation for the main topic of this article; creating a custom menu.
Custom Menu (creating a menu from JavaScript)
Suppose you have a collection of things (they could be in an interactive report, a list, a tree etc.) and you want a menu to open and the items in that menu will navigate to pages with content that is specific to the “current” thing in the collection. Specifying the content, instance, or context for a target page in APEX is typically done by including page attributes in the URL. For example:
f?p=353:2:14016445383772::::P2_DEPTNO:20:
This sets the department number (a primary key) to the value 20 so that this page will deal with that particular department.
The static list based menu we have seen so far wouldn’t know what value to use for P2_DEPTNO and has no way to change the value when a different thing in the collection is chosen. Creating a new menu for each thing in the collection just isn’t scalable and wouldn’t be any easier. You want to reuse the same menu widget.
There are two possible ways to handle this. One is to create a static list based menu as above but in the URL put place holder values for any page item values that change based on the current context. Then when the menu is opened (just be fore it is shown) change all the URLs3. The other option is to manually create a menu widget where the items have JavaScript actions that pick up the current context and create URLs to redirect to. I believe both options are doable. There are trade offs. Both methods require using JavaScript and use undocumented menu widget APIs. In this demo I choose the second option because it is more illustrative and possibly a little easier.
This demo consists of 3 pages. The main page (page 1) is an Interactive Report showing the departments from the DEPT table. The report includes an Actions column with a menu button in it. This means there is a menu button in each row and the actions in that menu are specific to the department in the row. Opening the menu gives you the option to Edit the department in a modal dialog page (page 3) or go to an employee report page (page 2) that shows all the employees (from the EMP table) in that department. This is not necessarily good UI design but it is a simple case that covers all the important points I want to make. One more special case, just to show off another menu feature, is that the ACCOUNTING department has the Edit menu item disabled4.
The reason I choose to include a dialog page in this example, other than they are an awesome new 5.0 feature, is because they present a particular challenge. The URL to a dialog must be generated on the server using the PREPARE_URL function (this is so that a checksum can be calculated to protect against click-jacking). But we need the dialog URL to be specific to the report row. If you try to use the apex.navigation.dialog API with a URL created on the client you will find that the dialog page doesn’t open because the checksum must be generated by APEX_UTIL.PREPARE_URL. When you use APEX_UTIL.PREPARE_URL for a page that is a dialog you will see that you get back a javascript url. That is fine if the URL is going into an anchor href or an onclick attribute but if the URL is sent to the client as a string it is useless unless you eval it and that is not a good idea. One option is to wrap the generated URL (which is really just code) in a function in a script tag but doing that in the context of a report, list or tree would not be easy. The other option used here is to strip away everything but the URL from the output of PREPARE_URL and send it to the browser in a data attribute. In this way we can call apex.navigate.dialog with a URL that has a valid checksum.
With this background out of the way it is time to explore the demo. To follow along you should download and import the Custom Menu Demo app. All the interesting menu stuff happens on page 1 so open it up in page designer.
The Departments Interactive Report SQL statement is as follows:
select DEPTNO,
       DNAME,
       LOC,
       case when DEPTNO = 10 then 'Y' else 'N' end as LOCKED,
       trim( both '''' from regexp_substr(
           apex_util.prepare_url(
               'f?p=' || v('APP_ID') || ':3:' || V('APP_SESSION') || '::NO::P3_DEPTNO:' || DEPTNO ),
           '''f\?p=[^'']*''') ) as EDIT_LINK
from DEPT
The LOCKED column will be used to control the disabling of menu items. The condition involving department 10 is arbitrary. You will have your own business rules.
The EDIT_LINK shows the technique I described above for extracting the dialog URL. It calls PREPARE_URL with the desired URL that includes the DEPTNO page item value. It then uses a regular expression to extract the URL and then strips off the single quotes.
LOCKED and EDIT_LINK columns are both hidden as the values are only needed in the Actions column. The DEPTNO select column is the report Actions column and uses the following HTML Expression.
<div class="report-actions">
<button type="button" class="t-Button t-Button--icon t-Button--noLabel js-menuButton"
    data-menu="actionsMenu" aria-label="Actions" title="Actions"
    data-id="#DEPTNO#"
    data-link="#EDIT_LINK#"
    data-title="#DNAME#"
    data-locked="#LOCKED#">
<span aria-hidden="true" class="fa fa-bars a-icon">
</span><span aria-hidden="true" class="fa fa-chevron-down"></span>
</button>
</div>
This markup creates a menu button. Just like the button from the Simple popup menu example above it follows all the rules for being a menu button. It is a button element and has class js-menuButton, and data-menu attribute. The other classes and span elements control the style so that it looks like other buttons in Universal Theme. The rest of the data-* attributes are for passing context information to the menu. The id of the menu is actionsMenu and we will create that next.
If this were a conference presentation I’m sure I would have run out of time by now. I considered breaking it into two topics but easiest to just forge on now. Feel free to take a break, get a snack and return later.
To create the menu, the following code is added to the Page 1 Execute when Page Loads attribute:
var menu$ = $("<div id='actionsMenu'></div>");
$("body").append(menu$);
menu$.menu({
  iconType: "fa",
  items: [
    {
      type: "action",
      labelKey: "ACTION_EDIT",
      icon: "fa-pencil",
      action: function(menu, btn) {
        // open dialog page 3 for the specific department
        // the dialog url including checksum is in the data-link attribute
        // on the button that opens the menu
        var link,
        button$ = $(btn);
        // get the link and unescape unicode chars
        link = button$.attr("data-link").replace(/\\u(\d\d\d\d)/g, function(m,d) {
          return String.fromCharCode(parseInt(d, 16));
        });
        apex.navigation.dialog(link,
                         {title: apex.lang.getMessage("TITLE_DEPT"),
                          resizable: true, draggable: true, height: 280, width: 460},
                         "t-Dialog--standard",
                         button$);
      },
      disabled: function() {
        var btn$ = $("button.is-active.js-menuButton");
        return btn$.attr("data-locked") === "Y";
      }
    },
    {
      type: "action",
      labelKey: "ACTION_EMP",
      icon: "fa-users",
      action: function(menu, btn) {
        // go to the employee page (2) for the specific department
        var btn$ = $(btn);
        apex.navigation.redirect(apex.util.makeApplicationUrl({
            pageId:2,
            itemNames: ["P2_DEPTNO", "P2_TITLE"],
            itemValues: [btn$.attr("data-id"), btn$.attr("data-title")]
        }));
      }
    }
  ]
});
This probably looks more complicated than it really is so lets break it down.
The first two lines simply add a div to the document body that will become the menu widget. The id of the div is actionsMenu and we already saw that id referenced by the menu button. This empty menu div could just as easily been added to the page as part of a static content region. This also creates the variable menu$ that we can use to refer to the menu div. It should be clear that there is one menu that is shared by all the menu buttons.
var menu$ = $("<div id='actionsMenu'></div>");
$("body").append(menu$);
Next is a call to initialize the menu widget
menu$.menu({
    iconType: "fa",
    items: [...
    ]
});
The options object has iconType, and items properties. The iconType specifies that any icons used in the menu will be FontAwesome icons. All other menu options have their default value. The items property is an array of menu items. Each item in the array specifies a menu item including its behavior. All the available options for the menu widget and menu items can be found in the comments at the top of the file libraries/apex/widget.menu.js. You will need to read them to get the most out of a custom created menu widget.
One nice thing about static lists is that the labels are easily localized. This can also be done for manually created menu widgets using Shared Component > Text Messages with Used in JavaScript set to Yes. In the demo app I created the following text messages.
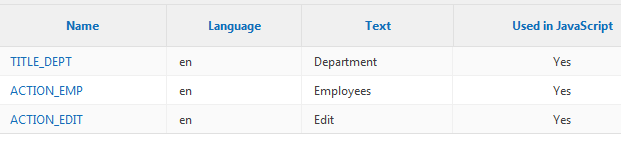
These messages can be accessed from JavaScript using the apex.lang APIs for example:
apex.lang.getMessage("ACTION_EMP")
The menu widget has a nice convenience feature where you can use the labelKey property and it will look up the message for you.
labelKey: "ACTION_EMP",
is the same as
label: apex.lang.getMessage("ACTION_EMP"),
The action property is a function that runs when the menu item is selected (invoked).
The Edit menu opens a dialog. Notice how the dialog URL is extracted from the data-link attribute on the button. The replace method is used to unescape Unicode characters in the URL.
  link = button$.attr("data-link").replace(/\\u(\d\d\d\d)/g, function(m,d) {
      return String.fromCharCode(parseInt(d, 16));
  });
With this sever generated link we can now use the documented apex.navigation.dialog function.
  apex.navigation.dialog(link,
             {title: apex.lang.getMessage("TITLE_DEPT"),
             resizable: true, draggable: true, height: 280, width: 460},
             "t-Dialog--standard",
             button$);
One interesting thing to note is that this code specifies all the dialog parameters such as title, width and height. This is a duplication of what is defined on the dialog page. With more effort this duplication could be removed by having the server extract the options from the result of PREPARE_URL, converting it to JSON and putting it in another data attribute. On the other hand this could be a useful technique in situations where different parent pages that open a dialog page want to control any of the dialog options.
The action for the Employees menu is much more straight forward it extracts the department id and title from from the button data attributes to pass to the Employees report page. It uses the documented apex.navigation.redirect API. It also uses the handy but currently undocumented apex.util.makeApplicationUrl function to construct the URL. See the comments in libraries/apex/util.js for details.
The disabled property can be true to create a menu item that is disabled. It can also be a function as shown here. If the function returns true the menu item is disabled. The Edit menu item disabled function looks at the data-locked attribute of the button. The fact that the menu button will have the is-active class is used to select the correct button. The action function doesn’t need this because it is passed in the element that had focus when the menu was opened.
Earlier I mentioned there were trade offs between the two ways to implement this context sensitive menu. Using an APEX list with place holder URLs has these advantages:
- The list is translated like any other list. You don’t need to define text messages so that the menu item labels can be translated.
- An APEX list based menu will result in menu items that are anchors (links). This means that standard browser behaviors such as right click, Open Link in New Tab work as expected. This may or may not be desired. You can achieve the same result with a menu created manually from JavaScript by defining an
hrefmenu item property rather than anactionproperty. (See theuseLinksmenu option and menu itemhrefproperty comments in the code for details.)
The disadvantage is that you have to update the menu item object href property in response to the menubeforeopen event/callback. This is for normal links. For opening a dialog or any other JavaScript behavior you need to remove the href property and add an action function. This can be done just once when the page loads.
As always with undocumented features you have to ask yourself if you should be using them. Is the risk worth the benefit. This comes down to:
- What is the impact if there is a future change that breaks the app. Will you or another capable person be around to make it work again.
- What is the likelihood of a change. With the menu widget you can see that APEX is heavily invested in it. This doesn’t mean the API can’t change but if we make a breaking change then we have to fix all the place where we use the menu also.
In many ways this is no different from using an open source 3rd party JavaScript library in the sense that it makes no promises about future APEX compatibility either.
That’s all there is to the demo. I would be very interested to hear how you make use of menus created from JavaScript.
I’ll take a few more questions:
Q: I noticed that some APEX menus have checkbox or radio group items and separators, is it possible for my menus to do similar things?
A:With menus driven by lists you can create separators by setting the href to “separator”. In this case the list entry label is not used so can be anything. I like to use “-“. To use checkbox items and radio items you have to create the menu from JavaScript. Again see the comments in file libraries/apex/widget.menu.js for details on item types of toggle and radioGroup.
Q: I made changes to the Menu Bar or Menu Popup list template markup but there was no effect on the menu markup. Why not?
A: The menu widget always works off of a JavaScript object structure such as the one shown here in the Custom Menu Demo app. Since APEX lists templates generate HTML and not JavaScript, a simple nested list markup is “parsed” into the JavaScript menu object on the client. So there really isn’t much you can change about the menu list template markup. If you are curious the rules for menu list markup can be found in the code comments.
Q: Is there any way to change the actual menu markup?
A: No, not really. There is a custom content feature of the menu but I don’t recommend using it because it is not mature enough. It is only used for the APEX builder account menu.
Q: Does this work for right click context menus as well?
A: Yes. The difference with right click menus is how the menu is opened and this was already shown. The other tricky part is figuring out what the current context is. Interactive Reports don’t have a concept of currently selected rows. You can use the event target to find the closest table row and get the context info from there. Remember that right click context menus should support the standard keyboard equivalent to open them for accessibility.
Q: How can I add context menus to a tree?
A: This is possible but the details will have to wait for a future article.
Footnotes:
(1) I described how to switch from side navigation to top navigation in APEX 5.0 AND KEYBOARD SHORTCUTS in step 2.
(2) This is the same situation described for actions buttons. See step 5 in APEX 5.0 AND KEYBOARD SHORTCUTS. Unfortunately the APEX Advisor will tell you that you forgot to define the dynamic action. You can safely ignore this warning for menu buttons and action buttons.
(3) To change the URL you need to change the menu item properties using the menu widget API. You can’t change the client generated menu markup.
(4) In a real app you would also want to use an authorization on the page to enforce that the department can’t be edited.
Very nice,
Can we trigger the menu on right-click on any-place of a given row ?